articles/Photoshop/photoshopfeaturescount-page1
Photoshop For Beginners - Lightroom Top 10 Features Count Down - part 1 of 1 2 3 4 5
by Mike McNamee Published 01/06/2010

Following McNamee's feature on Bridge, Art Suwansang now gets all his ducks in a row using Adobe Lightroom
Over the past two years, a growing number of digital shooters have quickly come to love Lightroom. While many swear by it, others are just beginning to enter the adoption phase. This article is meant to give all users, regardless of experience level, a glimpse into this amazing program's astonishing power, from speeding up workflow to quickly and easily applying creative adjustments to images.
The following top 10 Lightroom features are those that, I believe, can best enhance the way wedding and portrait photographers deal with their images.
Feature Number 10.
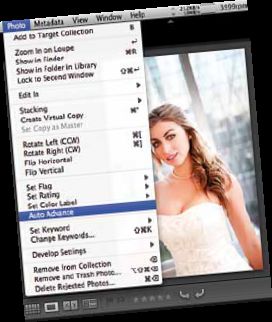
At the top of the countdown list is Auto Advance. One of the fundamental tasks that we photographers perform in Lightroom is the assignment of ratings to our images, also known as the selection process. The 'normal' way to select and rate an image in Lightroom is to assign a star rating or flag, and then press the right arrow key to advance to the next image. And although this is pretty quick and easy, there may be times when you need to get through this process even FASTER. When time is of the essence, Auto Advance is the answer. To activate the Auto Advance feature when editing, click ON the 'Caps Lock'; now once you assign a star or flag rating to an image, it will automatically advance to the next one, allowing you to get through the selection process in a fraction of the time. To disable, simply turn OFF the 'Caps Lock' key. To set this feature as the default every time Lightroom is launched, go to the menu at the top of the screen and select Photo > Auto Advance. You must be in the Library Module when you do this, otherwise this option might not show up. You can also use the menu to toggle on and off, as needed throughout the selection process.

There you have it, one tip down, and only nine more to go!
Feature Number 9.
Auto Synchronisation. Most of the time when we apply various adjustments to our images, we work on one image, then sync these new setting with other images photographed under similar lighting conditions; this is Passive Synchronisation. However, if you want to work even faster and see your adjustments applied real time to all selected images, then Auto Synchronization is for you. Before you get started, make certain you are in Lightroom's Development Module.
Now, here's a tip within a tip for you. Did you know there are two different ways of selecting images in Lightroom?
1. Select all images in sequence: Highlight the first image, hold down the 'Shift' key, then click on the last image in the sequence.
2. Select images in non-sequential order: Highlight the first image, then hold down the Command (or Control) key as you select other images by clicking on them.
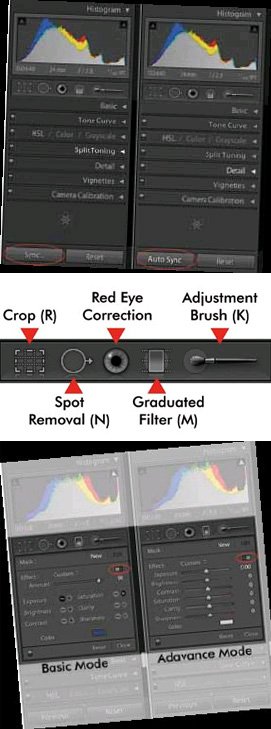
Once you have all the images selected, direct your attention to the 'Sync' button at the bottom of the right panel. Press the Command (or Control) key and watch this button become the 'Auto Sync' button. Now just have fun and apply the adjustments to the images as you normally would, all the while marvelling at Lightroom's speed in adjusting your selected images in a symphonic way.
Feature Number 8.
Graduated Filter. This is one of the newest local adjustment tools, recently released in Lightroom 2.0. Although it has some amazing and creative applications, I encourage you to use this tip as a foundation for experimentation, to come up with your own creative adjustments.
To begin, I suggest accessing the Graduate Filter tools located directly beneath the histogram panel on the right panel. Once open, toggle the panel to the Advance Mode (Lightroom refers to this as the 'Show Effect Sliders') by clicking on the horizontal toggle switch opposite to the word 'Effect', located in the upper right-hand corner of the panel.
You are currently on page 1
- Photoshop For Beginners - Lightroom Top 10 Features Count Down page 1
- Photoshop For Beginners - Lightroom Top 10 Features Count Down page 2
- Photoshop For Beginners - Lightroom Top 10 Features Count Down page 3
- Photoshop For Beginners - Lightroom Top 10 Features Count Down page 4
- Photoshop For Beginners - Lightroom Top 10 Features Count Down page 5
1st Published 01/06/2010
last update 09/12/2022 14:57:50
More Photoshop Articles
There are 0 days to get ready for The Society of Photographers Convention and Trade Show at The Novotel London West, Hammersmith ...
which starts on Wednesday 15th January 2025


