


articles/Photoshop/photoshopfeaturescount-page2
by Mike McNamee Published 01/06/2010
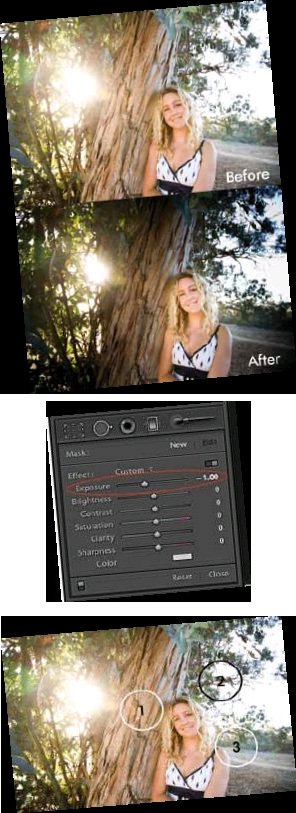
Now, let's use this tool to enhance a portrait. You have this nice portrait, however, your subject is not the centre of attention in the image, and the lighting around her is too bright. You can use the Gradient Filter tool here to darken the surrounding area, and make her pop. (If you're asking why you wouldn't use the Post Vignette tool here, it's because it will not give us the same level of control.)
You'll need to set up the adjustment parameters before you begin, however, keep in mind they can always be changed later on.
1. Bring the exposure slider of the graduate filter down to −1.00, note that −1.00 is a good starting value because the effect of filter can easily be seen, which makes it easier for later fine tuning.
2. Visualise the area where you want to apply the gradient. In this case, you would probably start with the tree bark to the left of her face, the sky on the upper right-hand corner of the frame and the area on the bottom-right corner.
3. To apply the graduate filter, hover the mouse over the area where the gradient should star t, then click and drag to apply the filter. In the case of this portrait, you would probably start with the tree bark; click and hold then drag the mouse diagonally towards her face, being careful to stop before touching her face to protect skin tonality.
4. To make changes to a previously applied Graduated Filter, click on the little dot for the point where you want to make the modification. Then refine to taste!
Feature Number 7.Adjustment Brush. This amazing tool performs the most basic of dodging and burning tasks, to the more advanced, such as skin softening, or even eyes enhancement. However, in this tip, this tool is used to perform selective colouring. Take this bridal image
Your vision is to make everything black and white except the bouquet, which you want in rich vivid colour. Normally you would have to process the RAW file into either a PSD or TIFF, and then take it into Photoshop to complete the effect. Well, not any longer! This process can now be performed quickly and easily within Lightroom.
1. First select the Adjustment Brush tool, and change the adjustment panel to Advance Mode by toggling the Show Effect Sliders horizontal switch, located in the upper right hand corner of the Adjustment Brush panel
2. Dial down the saturation to -100. This will take out all of the colour when painted on the image.
3. Then set the brush tool, in this case use a larger brush, (50 size, 0 feather, 100 flow and density) . Now use the brush just as your would in Photoshop, and paint over the entire image to turn it into to black and white.
Once this is done, erase the mask to bring back the colour of the bouquet.
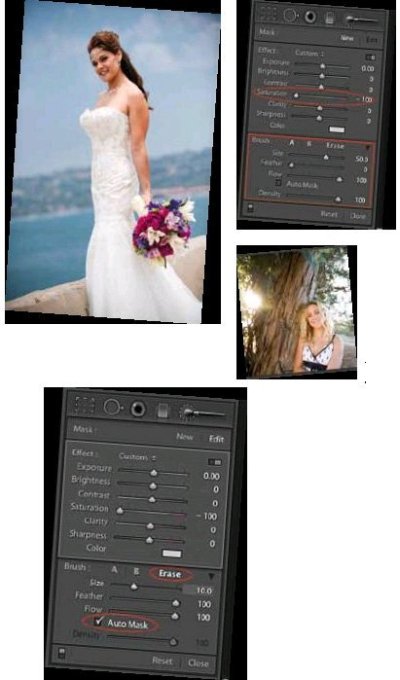
4. To do this, click the erase brush, change the size of the brush to about 10, add feather for a soft edge, then check Auto Mask (so Lightroom will automatically find the change in edge contrast and minimise colour spill over) . Now use this eraser brush to paint over and bring back the colours of the bouquet.
Feature Number 6.
Spot Removal. This tool has been around since Lightroom 1.0, it is primarily designed as a quick way to remove sensor dust from digital files. However, with some creativity, this tool can now be used for quick blemish, scar or even acne removal (similar to Photoshop's Clone and Healing brushes). Just remember to use Lightroom's Healing brush, and NOT the Clone brush (it samples the details and blends the colours).
1. Select the Spot Removal tool from the Local Adjustmentspanel. Make sure that the selected brush is set to 'Heal' . The brush size and opacity varies depending on the area being retouched.
2. Take a close look at this bride portrait, and you'll see two minor blemishes in the centre of her forehead. To remove them, hover the healing brush over one of the scar and adjust the brush to the proper size and click on the scar. Lightroom will automatically pick an adjacent sample area. If the sample area is not appropriate, you can click on the sample circle to move the sampling point around until you find one you like.
3. Repeat step 2 for any other scars, blemishes or acne.
There are 0 days to get ready for The Society of Photographers Convention and Trade Show at The Novotel London West, Hammersmith ...
which starts on Wednesday 15th January 2025


SWPP - Society of Wedding and Portrait Photographers
The Society of Photographers
Clwyd Chambers, Clwyd Street, Rhyl, Denbighshire, LL18 3LA, UK
Tel 00 44 (0) 1745 356935
Home Page - Find a Photographer - Benefits of Membership - Events and Seminars - Who's who - Photographic Trade Directory - About - Qualification Structure - Mentor Me Programme - Professional Imagemaker Magazine Articles - FREE information pack - Privacy