


articles/Photoshop/photoshopfeaturescount-page4
by Mike McNamee Published 01/06/2010
1. Start by selecting the image(s) needing this blue colour cast eliminated.
2. Click on the Hue Saturation Luminance panel on the right panel of the Development Module.
3. Click on Saturation, directly under the Panel Name.
4. Now click on the Targeted Adjustment Tool located in the top left-hand corner of the panel.
5. Move the Targeted Adjustment Tool over the blue area of the dress.
6. Click and hold, moving the mouse downward until the unwanted blue in the dress is gone.
Please note that if this image had a blue sky in the background, that this adjustment would de-saturate the blue sky too (this is still a global adjustment tool).
Now what do you think would happen if the opposite effect is desired?
This particular image could use more pop in the sky, and a brighter skin tone. Here are the steps to make this happen:
1. Click on the Hue Saturation Luminance Panel in the Development Module .
2. Click on Luminance, right under the panel name.
3. Click on the Targeted Adjustment Tool located in the top left-hand corner of the panel.
4. Move the Targeted Adjustment Tool over the blue sky area of the image.
5. Click and hold, moving the mouse downward to decrease the saturation in the sky according to taste.
Now to adjust the skin tone using the Luminance Adjustment:
1. Click on Luminance rightunder the HSL Panel Name.
2. Click on the Targeted Adjustment Tool located in the top left-hand corner of the panel.
3. Move the Targeted Adjustment Tool over the area of the groom's forehead.
4. Click and hold, then move the mouse upward to increase the luminance value of the skin, being careful not to push this too far (otherwise, you will make the other people's skin begin to look strange). Since all of the groomsmen's facial skin tone fall under the same colour range, thus this single adjustment will cause everyone's skin to pop too!
Feature Number 3
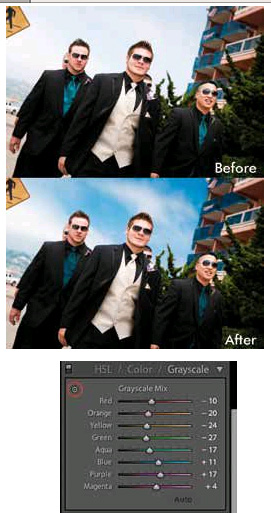
Using Gray Scale Mixer for an effective black and white image. A proper, full-tonal black and white image speaks to the quality of the photograph. While an image may easily be converted into a black and white by applying a greyscale treatment, the result is generally less than amazing (ie leaving the skin tones generally muddy, and many times darker than other tones in the image). To make a black and white image pop, we can now use the Grayscale Mixer to adjust the tonal luminance in the image. For comparative purpose, when analogue printing of black and white, changing the grayscale mixer is similar to printing with a multi-contrast gel (to achieve to deeper tonality and tonal range in an image).
In this case, let's take the previous image of the walking groomsmen. If this image was turned into black and white simply using greyscale, it would look very muddy . This image would benefit from a couple of tonal adjustments - two in this particular case. First, the skin is too muddy and needs more luminance or 'pop'. Second, the sky should be darkened so it doesn't compete with the skin tone, giving the image a dramatic look
To do this, start with a colour image, then,
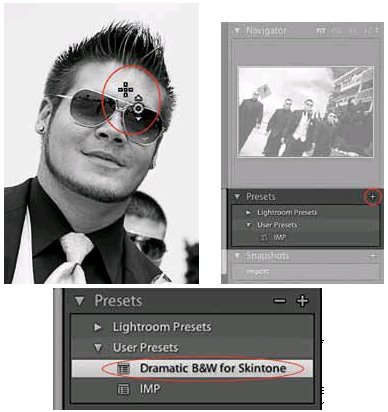
1. Select the Grayscale panel in the Development module; this will automatically turn the image into greyscale.
2. Click on the Targeted Adjustment Tool on the top left corner of the panel.
There are 0 days to get ready for The Society of Photographers Convention and Trade Show at The Novotel London West, Hammersmith ...
which starts on Wednesday 15th January 2025


SWPP - Society of Wedding and Portrait Photographers
The Society of Photographers
Clwyd Chambers, Clwyd Street, Rhyl, Denbighshire, LL18 3LA, UK
Tel 00 44 (0) 1745 356935
Home Page - Find a Photographer - Benefits of Membership - Events and Seminars - Who's who - Photographic Trade Directory - About - Qualification Structure - Mentor Me Programme - Professional Imagemaker Magazine Articles - FREE information pack - Privacy