articles/Monochrome/themonochromeissueintro-page4
The Monochrome Issue - Introduction - part 4 of 1 2 3 4 5 6 7
by Mile McNamee Published 01/04/2006

METHODS THE DETAIL
Mode>Grayscale
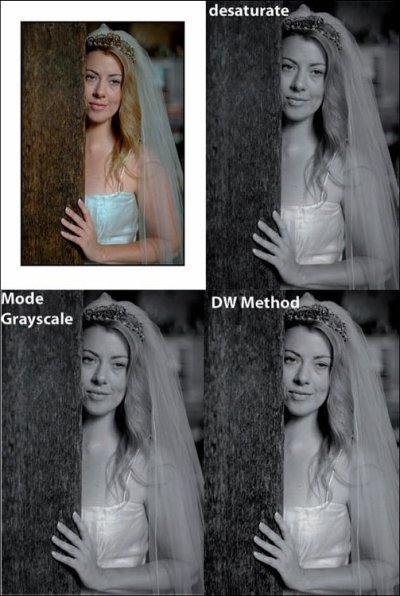
This is probably the fastest and easiest method. You click on Image>Mode>Grayscale and the job is done. Depending on your preference settings you may get a warning about discarding colour information. In the background, Photoshop is alleged to be doing a Channel mix of 60% green, 30% red and 10% blue. When we performed a conversion using a Grainger chart we did not find this to be so, neither did we get proper extinction using the Macbeth chart. The jury is still out on this one, answers on a postcard please! This method did not produce any artefacts. It makes a very sound basis for creating album page backdrops as it is fast and the exact tone conversion is not so critical.
Image>Adjust>Desaturate
This method does not reproduce the Mode>Grayscale result. Whilst the conversion of the greyscale was the same, the deep blue was 22 points different, the reds were 3 points different and the green was 22 points different. The yellow-black borders displayed artefacts. Probably one to avoid.
Image>Adjust>HSB>Desaturate
This was an identical result to that above and is also probably best avoided.
Russell Brown's Method
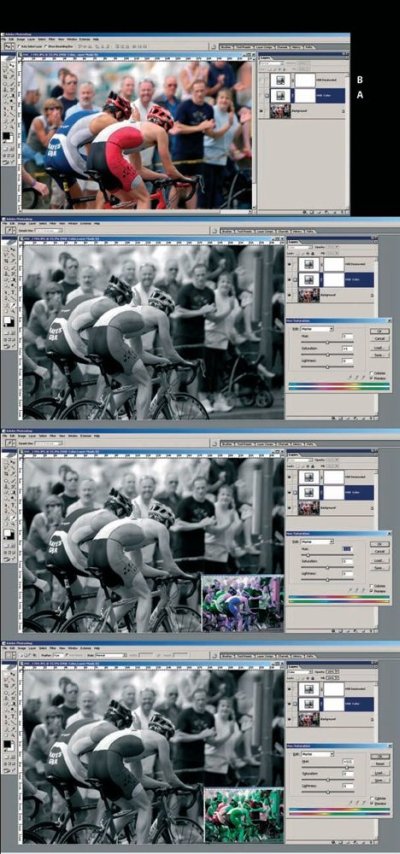
This is a method devised by Adobe Creative Director, Russell Brown. We have written on the subject before but repeat the advice here. With the slider values at zero it produced an identical result to both the previous methods, including the artefacts in the yellows. However its strength lies in the supreme flexibility of the conversion and the method cannot be eliminated from contention for that reason.

If you examine the composite screen grab (previous page) note that adjusting the Hue has altered the balance between the monochrome densities of the riders' lycra suits. Recipe
1. Open RGB image
2. Make an Adjustment Layer for Hue/Sat/Brightness, but don't do a thing, just click OK. [A]
3. Set mode of this layer to "Color"
4. Make another Adjustment Layer - Hue/Sat/Brightness.[B] Move Saturation to -100 (no colour). Close this layer
5. Double click on middle Adjustment Layer (the one set to Color Mode). Start moving the Hue slider. You can move the Sat and Lightness a bit too.
6. Fine-tune the conversion by clicking on specific colours (eg Red) and moving Hue Slider, which will only shift colours within the reds' colour range.
In addition, the technique supports Layer Masks. When you are all done, flatten the image.
Please Note:
There is more than one page for this Article.
You are currently on page 4
- The Monochrome Issue - Introduction page 1
- The Monochrome Issue - Introduction page 2
- The Monochrome Issue - Introduction page 3
- The Monochrome Issue - Introduction page 4
- The Monochrome Issue - Introduction page 5
- The Monochrome Issue - Introduction page 6
- The Monochrome Issue - Introduction page 7
1st Published 01/04/2006
last update 09/12/2022 14:59:44
More Monochrome Articles
There are 0 days to get ready for The Society of Photographers Convention and Trade Show at The Novotel London West, Hammersmith ...
which starts on Wednesday 15th January 2025


