


articles/Photoshop/endgame-page2
by Mike McNamee Published 01/02/2006
1. Find the lightest and darkest portions of the image using the Threshold function [1]. In the composite screen grabs an Adjustment Layer has been made for Threshold. At A, on the left, the highlight is selected and marked with the Color Sampler after dragging the Threshold slider to the right. At B, on the right, the threshold has been pulled back across the graph to detect the deepest shadow and then marked with the Color Sampler tool. The mid-tone C we will talk about later.
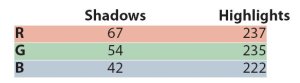
2. Referring to the info palette [2], which now contains the additional data for the Color Sampler points, we find that the RGB values are as follows: Our aim, therefore, is to drop the shadow red and green values down to the 42 points of the blue and raise the green and blue highlight values up to meet the 237 value of the red channel. When the RGB values are equal the colour is a neutral. This is accomplished using levels.
3. Discard the Threshold Adjustment layer as its job is done.
4. Make an Adjustment Layer for Levels.
5. Highlight the red channel in Levels then highlight the left-hand, shadows Input Level data entry box.
6. Click on the up arrow key while watching the data in the Info Palette. Note that the numbers alongside the dropper number (eg #1) should change from 67/67 until you get to 67/42, the target point for this example. What this has done is to bring the red channel value down to meet the lowest of the trio.
7. Now highlight the green channel, then the shadow Input Level and arrow key up until the Info Palette data moves from 54/54 to 54/42. This has brought the green channel down to meet the lowest of the trio. Note that your values are image dependent and you will be changing different channels to different values in real examples you may have. Also note that the values in alongside the girl's neck strap is 2 a good point to use as it showed data values of: the actual Levels palette are not important - you have to watch the Info Palette.
8. You now have neutral shadows
9. Highlight the green channel, then the highlight end of the Input Levels and arrow down until the 235/235 becomes 235/237 (ie a small change is this example)
10. Highlight the blue channel and then the highlight data entry box of the Input Levels and arrow down until the 222/222 becomes 222/237. Now you have neutral highlights
11. Add a third Color Sampler point to an area which should be a mid-tone neutral. In this case the area
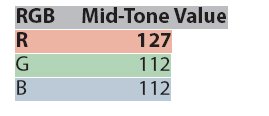
12. Make a Curves Adjustment Layer. Highlight the red channel, then click anywhere near the middle of the curve, to add a Control Point on the curve and bring out the Input and Output data-entry boxes. Type the red input value of 127 in the top box and the aim output value of 112 in the output box.
13. Move to the blue channel and click a Control Point, then type the input value of 112 and the output value of 127.
There are 0 days to get ready for The Society of Photographers Convention and Trade Show at The Novotel London West, Hammersmith ...
which starts on Wednesday 15th January 2025


SWPP - Society of Wedding and Portrait Photographers
The Society of Photographers
Clwyd Chambers, Clwyd Street, Rhyl, Denbighshire, LL18 3LA, UK
Tel 00 44 (0) 1745 356935
Home Page - Find a Photographer - Benefits of Membership - Events and Seminars - Who's who - Photographic Trade Directory - About - Qualification Structure - Mentor Me Programme - Professional Imagemaker Magazine Articles - FREE information pack - Privacy