


articles/Presentation/fameup-page2
by Mike McNamee Published 01/02/2009
2. Using a black, chisel-edge felt tip pen, mark out the area in deft, even strokes. We are not trying to make a loose mess here, so ensure that you cover most of the area and keep the stokes more or less parallel to each other. Do not however, worry about variations in density where the strokes overlap.
3. Scan the paper at full size and the same resolution as your picture image. Convert the scan to grayscale (in Photoshop: Image>Mode>Grayscale).
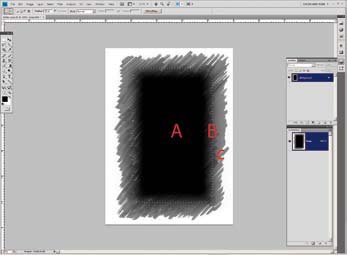
As scanned, the felt-pen image is probably not a full black and there are a number of options for refining it. You could go to Levels and drag the back slider to the right to deepen the blacks. If you do beware of making the entire thing too black as the subtlety of the pen strokes will be lost. Another option is to create a rectangular selection inside the jagged edges with quite a heavy feather applied (probably 25 to 50 pixels of feather). This selection can then be filled with solid black. In the screen grab the area A is fully black, B is a transition area and C is the ragged edge which will show felt pen marks in the final composite image.
4. Open your 'picture' image and tile it alongside your scan image using either Window>Arrange>Tile or the new 'Arrange Documents' tool of Photoshop CS4.
5. With your felt-pen scan focused as the active image, open the channels palette and shift-drag the channel called Gray across onto your picture image. Holding down the shift key forces the incoming alpha channel to the centre of the receiving image.
6. Your picture will now be hidden as an incoming alpha channel 1 is active.
7. If you click on the eye of the RGB Channel you will see your alpha channel 1 as a rubylith mask on top of your picture image. Now is the time to make any size adjustments, if they are needed for the coverage of the mask.
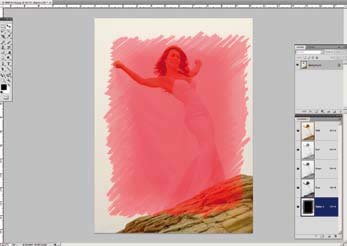
8. Control-click on the thumbnail of Alpha Channel 1 to load it as a selection. The click on the composite RGB channel in the channels palette. You should now see marching ants on top of your picture image.
9. Hit the Delete key to clear the background.
There are 0 days to get ready for The Society of Photographers Convention and Trade Show at The Novotel London West, Hammersmith ...
which starts on Wednesday 15th January 2025


SWPP - Society of Wedding and Portrait Photographers
The Society of Photographers
Clwyd Chambers, Clwyd Street, Rhyl, Denbighshire, LL18 3LA, UK
Tel 00 44 (0) 1745 356935
Home Page - Find a Photographer - Benefits of Membership - Events and Seminars - Who's who - Photographic Trade Directory - About - Qualification Structure - Mentor Me Programme - Professional Imagemaker Magazine Articles - FREE information pack - Privacy