articles/Photoshop/janeconner-zisermarylinsholinvikkipopwell-page5
Jane Conner-ziser Marylin Sholin Vikki Popwell - part 5 of 1 2 3 4 5 6 7
by Jane Conner-ziser Published 01/11/2005

The Dodge & Burn Mystery
Photoshop offers a variety of different ways to do the same thing, for example, dodging and burning. These are essential processes for many kinds of image editing - retouching, skin blending, image enhancements, matching cuts and pastes, making quick vignettes - anything that involves natural looking lightening or darkening of selected areas of your images.
Dodging and burning is a transparent process where you match values rather than covering things up. Do not try to blend everything in by painting over the edges. All of the methods, when used extensively, cause slight discolourations that are easily corrected. This drawback does not negate the powerful advantages of dodging and burning in creating beautiful, natural looking images.
Dodging and burning is easier with a WACOM pen, but if you have good bicep control, the mouse is possible.
In this article we will discuss the three most common methods of dodging and burning, go over the advantages and disadvantages of each, and learn when to use them for best results.
Dodge and Burn Tools - method 1
This is great for delicate retouching and skin blending. (Contrary to rumours, it's not "destructive" to your file - only you can destroy your files!)

Advantages:
You can dodge to white or burn to black so this method can be easily used for progressive gradations and extensive work. Because you're working on a duplicate layer of the background, colour corrections are simple. This method also provides a nice "edgy" look to the retouching.
Disadvantages:
The Background copy layer increases the size of the file, which may be a problem for some systems. Also, once you exceed the History States (default 20), going back requires making a patch and some reworking instead of erasing.
How to use the Dodge and Burn Tools:
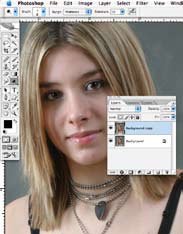
First, duplicate the Background to create a Background Copy. You will be working on the Background Copy. Set tool options to Range: Midtones and Exposure: 3-5%. (Note: the exposure % should be set so you can see results quickly without making streaks). Choose brushes that are just slightly smaller than the areas you want to match up to their surroundings. In the Brush Window, turn off Shape Dynamics to ensure evenness of application. For a quick change between Dodge and Burn that uses the identical brush and exposure, hold down the Option (Alt) key while you continue to work - it automatically applies the opposite effect. Release the key to use the tool's original function.
How to correct mistakes:
Open the History Window and step back in History States until the mistake has been removed. If you have exceeded the History States (Default 20), use the Lasso Tool to make a selection of the area that needs to be reworked, click on the Background and make a new layer via copy (Command or Control J) of the "before" piece. Drag the patch layer to the top, over the Background Copy, reduce the opacity (opacity slider in the Layers Window) to minimize reworking, merge it down (Command or Control e) and rework the area as needed.
How to correct discolourations:
Choose the Brush Tool. Set the options to Mode: Colour, Opacity: 20%, and Flow: 100%. Locate a colour you would rather see in the discoloured area, hold down the Option (Alt) key and click on it to select it. (Note: the correct colour is usually right next to the discoloured area). Brush a few coats over the discolouration until it blends in.
Please Note:
There is more than one page for this Article.
You are currently on page 5
- Jane Conner-ziser Marylin Sholin Vikki Popwell page 1
- Jane Conner-ziser Marylin Sholin Vikki Popwell page 2
- Jane Conner-ziser Marylin Sholin Vikki Popwell page 3
- Jane Conner-ziser Marylin Sholin Vikki Popwell page 4
- Jane Conner-ziser Marylin Sholin Vikki Popwell page 5
- Jane Conner-ziser Marylin Sholin Vikki Popwell page 6
- Jane Conner-ziser Marylin Sholin Vikki Popwell page 7
1st Published 01/11/2005
last update 09/12/2022 14:55:22
More Photoshop Articles
There are 0 days to get ready for The Society of Photographers Convention and Trade Show at The Novotel London West, Hammersmith ...
which starts on Wednesday 15th January 2025


